
Understanding the Problem Before Deciding on the Repair
Good Apple Repair Begins With More Than Replacing a Part
An Apple device can arrive with a simple description such as no power, intermittent startup, unexpected shutdowns, charging problems, or another function that no longer works. The visible symptom tells us where the investigation begins, but it does not automatically identify the component responsible.
A useful repair process turns that symptom into evidence. The device is inspected, the failure is reproduced when possible, relevant circuits are tested, and the findings are narrowed until there is a technical reason for the work being proposed.
The Repair Decision Should Follow the Diagnosis
Replacing a component makes sense when testing provides evidence that the component or its surrounding circuit is responsible for the failure. The part should not become the diagnosis simply because it is easy to replace.
What the Device Is Doing Provides the First Diagnostic Direction
The description of the problem matters. A Mac that never responds to power presents a different starting point from one that starts normally and shuts down after several minutes. A device that charges intermittently presents different evidence from one that does not recognize a charger at all.
Details about when the problem began, whether anything happened immediately beforehand, and whether the behavior changed over time can help determine which systems deserve attention first.
What Changed Before the Failure Appeared?
A liquid exposure, impact, previous repair, electrical event, software change, or gradually worsening symptom can provide context that would otherwise be missing from the device on the workbench.
Visible Evidence Can Narrow the Investigation Before Measurements Begin
Inspection can reveal corrosion, damaged connectors, burned components, displaced parts, previous soldering, missing fasteners, damaged flex cables, contamination, or physical evidence of impact.
Not every electrical failure leaves something visible. A component can look completely normal while failing electrically, so visual inspection provides evidence without replacing circuit testing.
Appearance and Electrical Condition Are Different Things
A clean-looking logic board can contain a failed component, while a visibly discolored area does not by itself establish which part caused the original problem.
A Problem That Can Be Observed Can Usually Be Described More Precisely
When the condition permits safe testing, reproducing the complaint helps establish what the device actually does. Does current consumption begin when power is connected? Are expected voltages present? Does startup begin and stop at the same stage each time? Does the failure appear only after the board warms?
These observations turn a general statement such as not working into a more specific electrical or functional condition.
The Symptom Should Become More Specific as Diagnosis Progresses
Each useful test should reduce uncertainty rather than simply add another possible cause to the list.
The Board Can Be Divided Into Circuits Instead of Treated as One Large Part
An Apple logic board contains many interconnected systems responsible for power regulation, processing, memory, storage, charging, communication, display functions, and other operations.
When one function fails, measurements can help determine which portion of that larger system is operating correctly and where expected electrical behavior changes.
Power
Voltage and power-sequence checks can establish whether required electrical rails are present at the appropriate stages.
Resistance
Measurements on unpowered circuitry can help identify abnormal paths, shorts, or differences that deserve closer investigation.
Signals
Some failures require examining enable, communication, clock, or other signals after basic power conditions have been established.
Measurements Reduce a Large Logic Board to a Much Smaller Area
A board-level problem can initially involve hundreds of components. The purpose of diagnosis is to avoid treating all of them as equally suspicious.
Testing known points along the relevant circuit can establish where expected behavior remains normal and where it changes. That boundary can direct attention toward a small group of components instead of the entire logic board.
Every Measurement Should Answer a Question
Testing is most useful when there is a reason for choosing the point being measured and an expectation for what the result should reveal about the circuit.
The Image Shows the Point Where the Investigation Became Component Specific
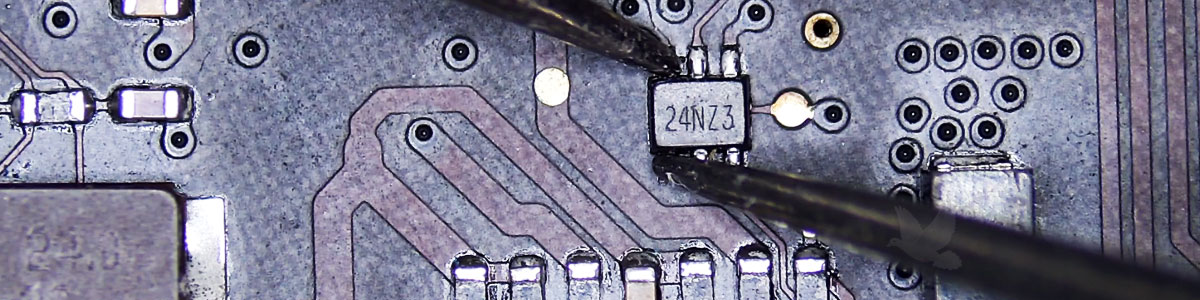
The logic board in the article image has already been narrowed to a small six-pin integrated circuit marked 24NZ3. The meter probes are positioned across two of its pins as part of the electrical testing that identified this component and the surrounding circuit as the problem area.
At this stage, the important information is not simply that a tiny IC exists on the board. The significance comes from the measurements that led the investigation to those six pins.
A component becomes meaningful when the circuit explains why it is being tested.
A Meter Reading Needs the Circuit Around It for Context
A resistance, diode-mode, continuity, or voltage measurement does not automatically mean good or bad by itself. The expected result depends on what the pins do, how the component is connected, and whether the board is powered during that particular test.
Measurements can also be influenced by other components connected to the same electrical path. That is why a suspicious reading may lead to additional tests before a component is removed.
One Number Is Not a Diagnosis
The reading has to be interpreted according to the circuit being measured. Similar values can mean very different things at different locations on a logic board.
The Strongest Diagnosis Uses More Than One Piece of Evidence
A suspected IC can be evaluated through the electrical behavior around it, comparison with related circuit points, thermal behavior, surrounding components, and the effect that the suspected fault has on the rest of the board.
The objective is to reach a point where replacing or removing the component is supported by the evidence rather than performed merely as an experiment.
Before Repair
Record the abnormal electrical condition and the symptom it creates so there is a baseline against which the repair can be evaluated.
After Repair
Repeat relevant measurements and functional tests to determine whether the abnormal condition and original symptom have actually changed.
The Technical Finding Should Be Explained in Understandable Terms
A customer does not need to know every electrical detail of a six-pin integrated circuit to understand what was discovered. They should, however, be able to understand the nature of the failure, what repair is being considered, and why that repair makes sense.
Clear communication separates what has been observed from what has been concluded. It also distinguishes a confirmed fault from something that remains uncertain and requires additional testing.
Technical Accuracy Does Not Require Unnecessary Complexity
The explanation can remain precise without burying the actual repair decision beneath terminology that does not help someone understand what is happening to the device.
Different Failures Can Justify Different Levels of Repair
Some problems are resolved by replacing a modular component. Others require connector work, corrosion repair, circuit reconstruction, or replacement of an individual component on the logic board.
The appropriate approach depends on what failed, the condition of the surrounding board, the availability of suitable parts, the value of the device and its data, and whether the repair can reasonably restore reliable operation.
The Smallest Repair Is Not Automatically the Best Repair
Component-level work makes sense when the board and surrounding circuitry support it. A damaged area involving multiple layers or extensive corrosion can require a different decision.
Important Measurements Should Be Preserved Before the Circuit Changes
Once a component is removed, the electrical condition of the board changes. Recording relevant readings beforehand creates a useful comparison for determining whether removal or replacement affected the fault.
Photographs and notes can also preserve component orientation, board condition, and the original state of the repair area.
Keep a Before and After Reference
The more precisely the original fault is documented, the easier it becomes to determine whether the repair corrected that specific condition.
Replacing a Six-Pin IC Still Requires Precision
A component can be physically tiny while the work around it remains demanding. Nearby capacitors, resistors, connectors, shields, and other integrated circuits can sit only millimeters away.
Controlled heat, appropriate airflow, careful tool placement, board support, and correct soldering technique help protect surrounding components and the circuit-board pads underneath the device being replaced.
Small Components Can Create Large Repair Problems
Excessive heat or mechanical force can damage pads and neighboring components, creating additional faults around the original repair area.
The Empty Circuit Can Provide Another Diagnostic Checkpoint
When a suspected component is removed, relevant measurements can be repeated before a replacement is installed. If the abnormal condition changes as expected, the result can provide additional support for the diagnosis.
If nothing changes, the investigation may need to continue elsewhere on the same electrical path rather than assuming the removed component was responsible.
Did the Circuit Change When the IC Was Removed?
The answer can prevent a replacement component from being installed into a circuit whose original fault still remains.
The Correct Part Has to Match More Than the Number of Pins
A six-pin package can contain many completely different types of devices. Physical appearance alone does not establish electrical compatibility.
Component identification, pin configuration, electrical characteristics, operating limits, circuit function, and orientation all matter when selecting and installing a replacement.
Fits the Pads Is Not a Specification
A component can physically fit the same footprint and still be completely wrong for the circuit.
The Repair Area Should Be Examined Before Power Returns
After soldering, the component and surrounding area can be inspected for alignment, solder bridges, incomplete joints, disturbed neighboring parts, contamination, or damaged pads.
Relevant resistance measurements can also be repeated before applying power when appropriate to the circuit.
Inspect Before Testing With Power
A few moments of inspection can identify an obvious soldering problem before electrical power turns it into a more serious board failure.
A Successful Startup Is an Important Result but Not the Final Result
If the Apple device begins operating after repair, that establishes that something important changed. The original failure still needs to be tested under the conditions in which it previously appeared.
Relevant voltages, charging behavior, startup reliability, temperature, peripheral functions, and other systems disturbed during the repair may also require verification.
Repair Success Should Be Measured Against the Original Failure
If the device originally failed intermittently, one successful startup does not prove that the intermittent condition has been eliminated.
The Information on the Device Can Be More Important Than the Hardware
Logic-board repair can sometimes matter because important information remains stored on the original device. Photographs, documents, messages, application data, and account information may have value far beyond the physical computer or mobile device.
When data preservation is part of the repair objective, decisions about replacement, erasure, operating-system work, and board handling should take that requirement into account from the beginning.
Hardware Replacement and Data Recovery Are Not the Same Outcome
A replacement device can restore access to a working product while doing nothing to recover information that existed only on the failed original hardware.
Earlier Repairs Can Become Part of the Current Diagnosis
A logic board may arrive with replaced components, added jumper wires, disturbed shields, missing screws, flux residue, damaged pads, or other evidence of previous work.
Those changes do not automatically mean the earlier repair caused the current failure, but they become part of the physical history of the board and should be considered during diagnosis.
Document What Was Already There
Separating preexisting board condition from new repair work helps keep the diagnosis and final explanation accurate.
The Device Should Leave With the Repair Verified
Final testing returns to the reason the device required repair. The original symptom should no longer be present, and functions affected by disassembly or board work should be checked according to the scope of the repair.
When the original failure appeared only after extended operation, charging, sleep and wake cycles, temperature changes, or another repeatable condition, verification should account for that history when practical.
Original Failure
Confirm that the symptom used to diagnose the device has been corrected rather than merely disappearing temporarily.
Repair Area
Verify that electrical measurements and behavior around the repaired circuit are consistent with normal operation.
Related Functions
Test the systems and connections affected by disassembly, component replacement, or other work performed during the repair.
A Completed Repair Should Have a Clear Story From Symptom to Solution
The useful explanation is straightforward. This was the original symptom. These tests narrowed the failure to this circuit. These measurements identified the abnormal area. This was the component-level repair performed. These tests confirmed the result afterward.
That sequence gives technical work context without requiring the customer to interpret a board schematic or understand every pin on the 24NZ3 IC.
Clear Communication Is Part of a Good Repair Process
Knowing what was found, what was changed, and how the result was verified makes the repair easier to understand and provides a useful record if the device develops another problem later.
Careful Diagnosis Makes the Repair Easier to Explain
The tiny six-pin 24NZ3 IC in the article image represents the end of a much larger diagnostic process. The repair did not begin with that component. It began with a symptom and moved through inspection, measurements, circuit analysis, and progressively narrower possibilities until the problem reached a specific area of the logic board.
That same evidence creates clear communication. Instead of describing an Apple device as simply fixed or broken, the repair can be explained through what failed, how the problem was identified, what work was performed, and how normal operation was verified afterward. The component may be tiny, but the reasoning that leads to it is what makes the repair understandable.
