
Diagnosis Should Reduce Uncertainty With Every Test
Fixing a Computer Correctly Begins With Finding What Actually Failed
A computer can refuse to start, lose power, freeze, restart unexpectedly, run slowly, overheat, stop charging, lose network access, or develop problems with individual devices. The visible symptom tells us what the user experiences, but it does not automatically identify the cause.
Effective troubleshooting moves from the symptom toward increasingly specific evidence. Each useful test should eliminate possibilities, confirm expected behavior, or identify where normal operation changes.
The Symptom Is the Starting Point
Replacing the first component associated with a symptom is not the same as diagnosing the failure. The repair should follow evidence rather than assumptions.
A Precise Description Makes Troubleshooting More Efficient
Statements such as the computer is broken or does not work leave too many possibilities open. A more useful description identifies exactly what happens and when it happens.
Does the computer remain completely dead? Do fans start without a display? Does Windows begin loading and then fail? Does the problem appear only after the system becomes warm? Does moving a cable change the behavior?
What Does the Computer Actually Do?
Separating no power, no display, failed startup, freezing, crashing, and poor performance immediately creates more useful diagnostic paths.
What Happened Before the Problem Can Matter as Much as the Symptom
A failure that appeared after an electrical event, liquid exposure, hardware installation, impact, operating-system update, previous repair, or gradual decline provides information that should not be ignored.
The history does not prove the cause, but it can determine which possibilities deserve attention first.
Timing Creates Context
If a computer stopped working immediately after a specific event, that relationship deserves investigation without automatically assuming that the event caused the failure.
Basic Causes Should Be Eliminated Before Complex Ones Are Pursued
A disconnected cable, failed power source, incorrect setting, loose component, damaged peripheral, or simple configuration problem can create symptoms that resemble a more serious failure.
Checking the straightforward possibilities first prevents unnecessary disassembly and avoids spending time investigating motherboard circuitry when the problem exists outside the computer.
Power
Confirm that the expected power source and connections are available before investigating internal power circuitry.
Connections
Inspect relevant cables, connectors, peripherals, and internal connections when the symptom points toward them.
Configuration
Determine whether software, firmware, or settings can explain the behavior before hardware is replaced.
A Repeatable Failure Gives the Diagnosis Something to Measure
When the condition can be reproduced safely, the computer can be observed as the failure occurs. That allows voltage, temperature, software behavior, current consumption, error information, or other relevant conditions to be compared before and during the problem.
An intermittent failure may require more observation, but even intermittent problems often develop patterns involving temperature, movement, workload, battery level, or time.
Repeatability Turns a Complaint Into a Test
If the same conditions consistently produce the failure, those conditions can later be used to determine whether the repair actually corrected it.
The Same Visible Problem Can Begin on Either Side
Failed startup can result from storage hardware or corrupted system files. Freezing can involve memory, storage, temperature, drivers, or applications. Network loss can originate in hardware, configuration, cabling, or equipment elsewhere on the network.
The repair process should determine which side of the system contains the fault before unrelated parts or software are changed.
Similar Symptoms Do Not Require Identical Repairs
Two computers can behave almost exactly the same while having completely different underlying failures.
A Dead Computer Can Require Following the Power Path
When diagnosis points toward an electrical failure, testing can move through the power system rather than treating the motherboard as one indivisible component.
Input power, protection circuitry, switching components, regulators, power rails, enable signals, and downstream loads can each be evaluated according to the circuit and the failure being investigated.
Find Where Normal Electrical Behavior Changes
The point where an expected voltage, resistance, signal, or power condition becomes abnormal can narrow a large circuit board to a much smaller diagnostic area.
Resistance Measurements Can Reveal an Abnormal Path Before Power Is Applied
With the circuit appropriately disconnected from power, resistance measurements can help identify rails or circuit areas that have an unexpectedly low-resistance path.
A low reading does not automatically prove that a short exists because some circuits normally have low resistance. The result has to be interpreted according to the circuit being tested.
Low Resistance and a Short Are Not Always the Same Thing
Expected electrical characteristics vary across a motherboard. A measurement becomes useful when it is compared with what that particular circuit should normally show.
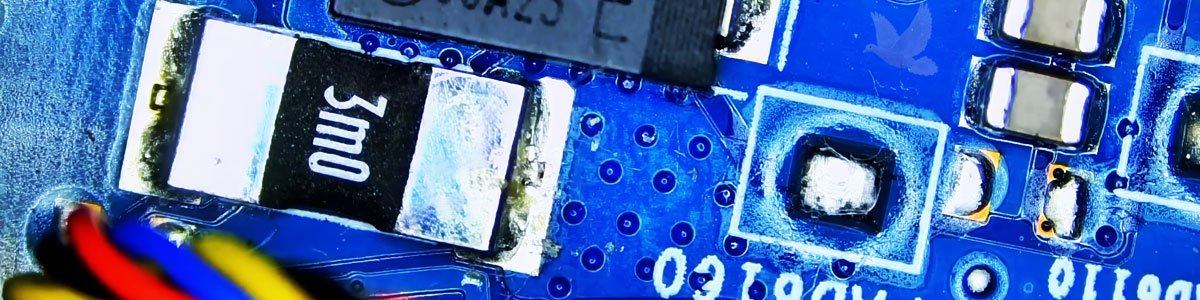
The 3M0 Resistor Area Shows That Something Is Electrically Wrong
The computer circuit shown in the article image is being measured around a resistor marked 3M0. The result indicates an abnormal electrical condition that makes a short somewhere on the associated circuit an important possibility.
This measurement does not mean the resistor itself must be defective. A resistor can provide a convenient point from which to measure a rail containing many electrically connected components.
The place where the short is measured is not necessarily the component causing the short.
Connected Components Can Share the Same Abnormal Measurement
A power rail can connect capacitors, integrated circuits, MOSFETs, resistors, and other components. If one component creates a short to ground, measurements taken at multiple points on that rail may all show the same abnormal condition.
That is why identifying the rail is different from identifying the failed component.
One Fault Can Appear at Many Test Points
Electrical continuity along a rail allows the effect of a single shorted component to be measured in locations physically separated from the actual failure.
A Component Marking Helps Identify the Part but Does Not Diagnose It
The marking visible on a component can provide useful identification information when interpreted according to the component type and board design. Its location in the circuit provides additional context.
The important diagnostic question is whether the component itself behaves abnormally or whether the abnormal measurement is coming through the circuit connected to it.
Is the Resistor the Failure or Merely Where the Failure Was Measured?
Additional testing is needed before a visible component is blamed simply because the meter probes happened to be placed there.
A Shorted Rail Has to Be Narrowed to the Component Responsible
Once an abnormal rail has been identified, the next stage is determining which connected component creates the unwanted path. Board documentation, circuit topology, visual inspection, resistance comparisons, thermal behavior, and controlled diagnostic techniques can help reduce the possibilities.
The method chosen depends on the circuit and the electrical condition already established.
The Goal Is Not to Remove Parts at Random
Component removal changes the circuit. It should be guided by evidence that makes the suspected component meaningfully more likely than the others connected to the same rail.
A Shorted Component Does Not Always Look Damaged
Burn marks, cracks, corrosion, displaced components, liquid residue, or previous repair work can provide valuable clues, but an electrically failed semiconductor or capacitor can appear completely normal.
Magnification helps identify physical evidence while electrical testing determines whether apparently clean components behave correctly.
Clean Appearance Does Not Prove Electrical Health
Visual inspection and electrical measurement answer different questions and work best when used together.
An Electrical Fault Can Sometimes Reveal Itself Through Heat
A component conducting abnormal current may produce heat when the circuit is energized under suitable controlled diagnostic conditions. Temperature differences can help narrow a shorted rail containing many possible components.
Thermal behavior must still be interpreted correctly because the hottest component is not automatically the original cause in every circuit.
Controlled Testing Matters
Applying power to a known short without understanding the circuit can damage components or board traces. Diagnostic power conditions should be appropriate for the circuit being investigated.
Removing a Suspected Part Can Confirm Whether It Created the Short
When evidence strongly identifies a component, removing it can separate that device from the rest of the rail. The relevant resistance measurement can then be repeated.
If the abnormal condition disappears, the result provides strong evidence that the removed component was responsible. If the short remains, diagnosis continues elsewhere on the circuit.
Short Disappears
The change supports the conclusion that the removed component was creating the abnormal electrical path.
Short Remains
The rail still contains the fault, so installing a replacement immediately would not address the unresolved condition.
The Correct Replacement Must Match the Electrical Requirement
Physical size alone does not establish component compatibility. Electrical characteristics, package, orientation, rating, circuit function, and other specifications can matter depending on the part being replaced.
Installing an incorrect component can create a new failure even when it fits perfectly on the original pads.
Fits Is Not the Same as Compatible
A replacement component should be selected according to the circuit requirements rather than appearance alone.
The Original Abnormal Measurement Should Be Checked Again
Once the failed component or damaged circuit has been repaired, returning to the original test point provides a direct comparison with the condition observed before repair.
If the abnormal resistance condition has changed as expected, the circuit can proceed to additional checks before normal power is restored.
Use the Original Failure as the Reference
A repair is easier to verify when the electrical condition that identified the fault can be measured before and after the work.
A Computer Turning On Is an Important Result but Not the Final Test
Restored power establishes that the repair changed something significant. The system should still be observed for stable startup, normal voltages, appropriate temperatures, reliable operation, and the absence of the original symptom.
Functions affected by disassembly or component-level work should also be checked before the repair is considered complete.
Test Beyond the Power Button
A system that starts once but fails again under load, after warming, or during normal use has not yet demonstrated a reliable repair.
The Same Diagnostic Discipline Applies Beyond Motherboard Repair
IT troubleshooting may involve operating systems, networks, storage, applications, user accounts, printers, backups, security, or communication between multiple devices. The technology changes, but the reasoning remains similar.
Define the problem, establish what still works, identify where expected behavior changes, test the most meaningful possibilities, and verify the result against the original failure.
Observe
Establish exactly what is happening before changing the system being diagnosed.
Test
Use evidence to separate likely causes from possibilities that do not fit the observed behavior.
Verify
Return to the original complaint after the repair and confirm that the conditions producing it no longer do so.
Replacing Parts Until Something Works Can Hide the Real Failure
Guessing can occasionally produce a working computer, but it does not establish why the system failed. It can also increase cost, disturb working components, introduce new problems, and make later troubleshooting more difficult.
A systematic process creates a chain of evidence from the original symptom to the final repair.
A Changed Symptom Is Not Always a Solved Problem
If a repair attempt alters the computer’s behavior without eliminating the underlying failure, the diagnosis should continue rather than treating the change itself as success.
Measurements and Observations Create a Useful Repair Record
Recording important readings, component locations, visible damage, error information, and behavior before repair makes comparison easier afterward.
Documentation becomes particularly useful during intermittent failures or complex board-level work where several diagnostic stages may occur before the defective component is identified.
Remembering Is Not the Same as Recording
A photograph, measurement, or written observation preserves the original condition after the circuit has been changed by the repair.
The Repair Should Be Proven Under the Conditions That Exposed the Failure
If the computer originally failed during startup, startup needs to be tested. If it became unstable under sustained workload, it should be observed under an appropriate workload. If movement caused an intermittent connection, that condition should be checked after repair.
Verification closes the diagnostic loop by returning to the same evidence that originally established the problem.
The Original Complaint Defines the Final Test
The strongest confirmation is not simply that the computer does something correctly. It is that the specific failure that brought it into repair can no longer be reproduced.
The Right Repair Comes From Understanding the Failure
The computer circuit shown above demonstrates how a broad complaint can eventually become a specific electrical investigation. Measurements around the resistor marked 3M0 reveal that the circuit is not behaving normally and that a short somewhere on the associated path needs to be traced.
The resistor itself may or may not be responsible. Finding the real failure requires following the circuit, interpreting measurements in context, narrowing the affected rail, identifying the component creating the abnormal condition, repairing it, and then returning to the original measurement and computer symptom for verification. That process is what separates replacing parts from actually diagnosing and fixing the problem.
